
Forget messy carving—this year, adults everywhere are falling in love with pumpkin painting. It’s chic, fun, and surprisingly therapeutic. Whether you’re planning a Halloween party, decorating your home for fall, or just looking for a creative evening project, painted pumpkins are the perfect way to upgrade your décor without knives and mess.
Why Adults Should Try Pumpkin Painting
Pumpkin painting isn’t just for kids anymore. In fact, adults are embracing it as the new stress-busting DIY trend. Here’s why:
- No mess, no stress: Unlike carving, you won’t be scooping out seeds or worrying about rotting pumpkins.
- Safer and long-lasting: Painted pumpkins last longer indoors and can even be reused if you opt for faux ones.
- Creative expression: It’s basically a blank canvas waiting for your imagination—modern, spooky, or classy, the choice is yours.
- Social activity: Hosting a pumpkin paint night with friends and wine is becoming the adult Halloween version of game night.
Insider Tip: If you love mindfulness activities, painting pumpkins can be as calming as adult coloring books or pottery.
Essential Supplies You’ll Need
Before you dive into designs, gather your materials. A little preparation makes the process smooth and enjoyable.
- Pumpkins: Real for that authentic fall vibe, or faux if you want to reuse them.
- Paints: Acrylics are a go-to, but spray paints, chalk paints, and even metallic shades can take your pumpkin from cute to classy.
- Brushes & tools: Foam brushes, fine-tipped brushes for details, and painter’s tape for clean lines.
- Extras: Glitter, rhinestones, ribbons, lace, stencils—because details matter.
- Sealant: A clear spray sealant keeps your art protected and glossy.
Pro Tip: Wipe your pumpkin with a damp cloth and let it dry before painting. This helps paint stick better.
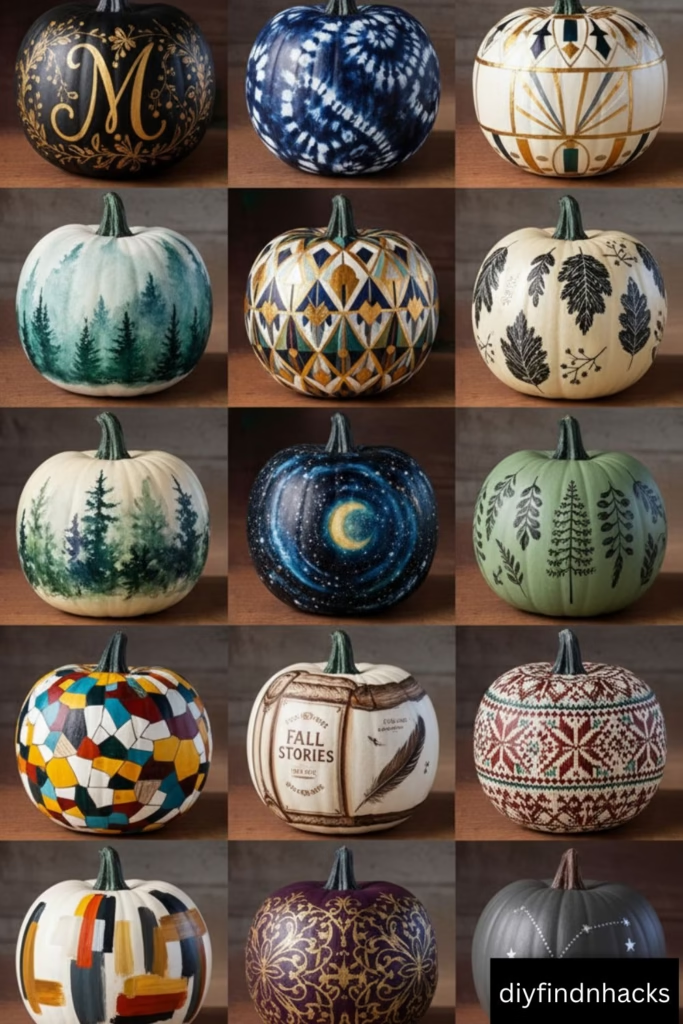
Elegant & Aesthetic Pumpkin Painting Idea
Who says pumpkins can’t be stylish? These adult-approved designs look straight out of a Pinterest mood board.
- Metallic Glam Pumpkins: Spray your pumpkin in gold, silver, or rose gold for a luxe centerpiece.
- Minimalist Monochrome: A white pumpkin with black designs or matte black with gold accents—simple yet sophisticated.
- Marble Effect: Use nail polish marbling or pour paint techniques to get a chic marble swirl design.
Pro Tip: Pair metallic pumpkins with candles and white décor for an Instagram-worthy fall vibe.
Halloween-Inspired Pumpkin Designs
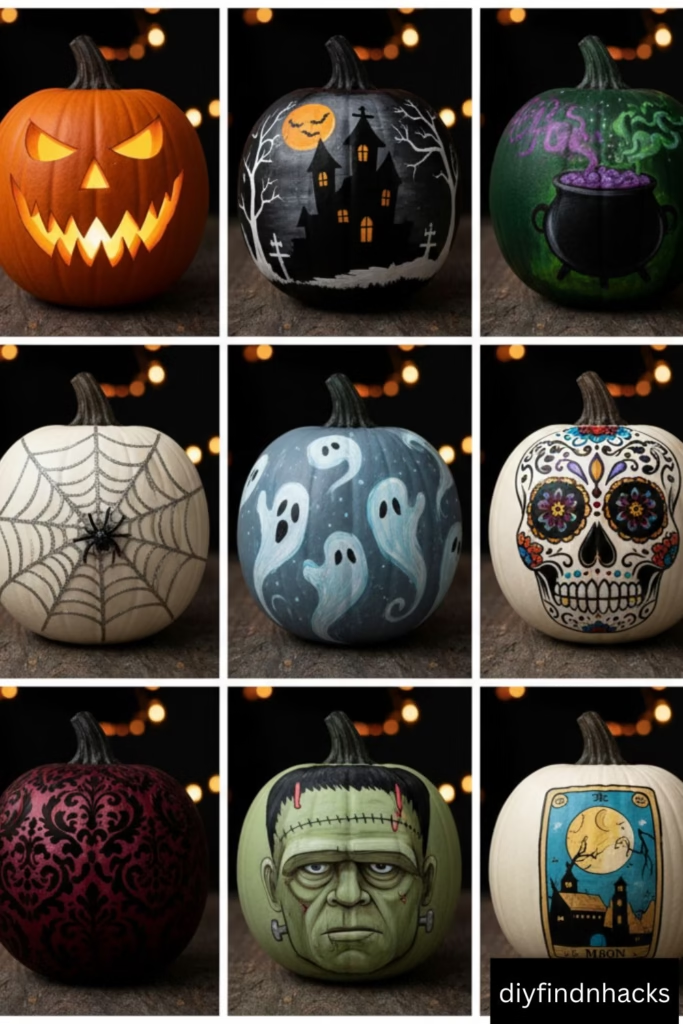
Of course, Halloween wouldn’t be complete without spooky pumpkin ideas. These painted versions give the thrill without the goo.
- Spooky Silhouettes: Paint a haunted house, bats, or a creepy witch shadow.
- Glow-in-the-Dark Pumpkins: Special paints light up in the dark—perfect for doorsteps.
- Ombre Witchy Night: Blend purple, blue, and black for a magical ombre background, then stencil stars or moons on top.
Insider Tip: Use glow paints only on top layers—layering them over a dark base makes the glow stronger.
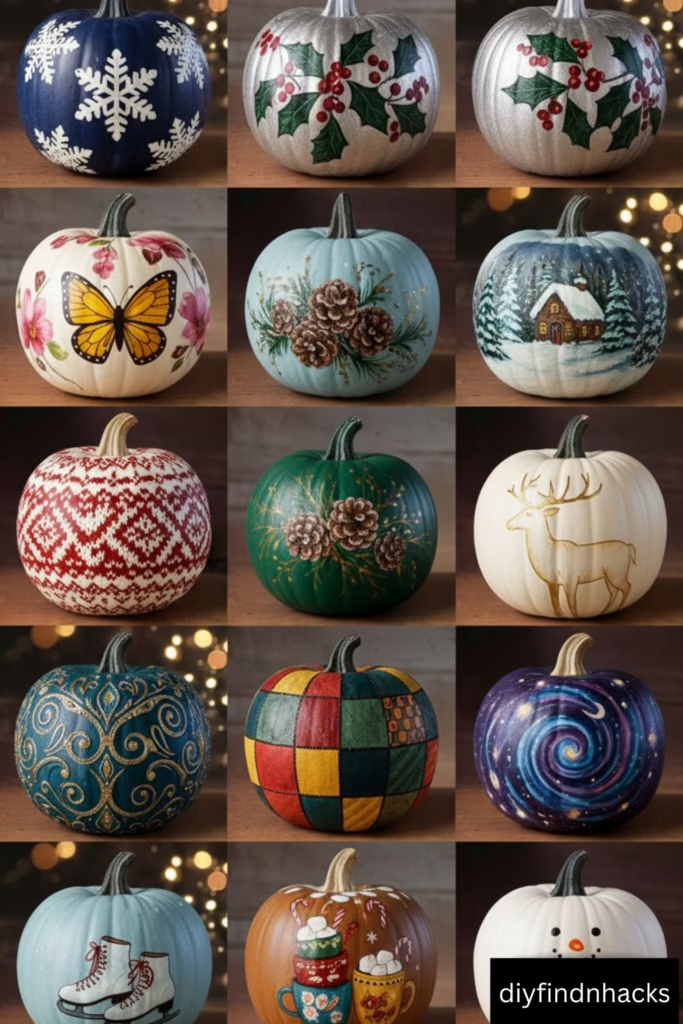
Cozy Fall-Themed & Rustic Pumpkin Ideas
Not into spookiness? Go for warm, autumnal vibes that fit right into farmhouse or cozy home décor.
- Rustic Farmhouse Look: Paint your pumpkin in buffalo check or plaid designs. Add a bit of burlap ribbon.
- Leaf Prints: Use stencils or real leaves dipped in paint to create seasonal prints.
- Pumpkin Spice Latte Design: Yes, PSL pumpkins are a trend! Paint coffee cups, whipped cream swirls, or cozy latte art on your pumpkin.
Pro Tip: Place these on your dining table or mantel for a cozy, cabin-in-the-woods effect.
Modern & Trendy Painted Pumpkins
For those who like bold, artsy styles—these modern pumpkin designs are for you.
- Geometric Patterns: Use painter’s tape to block off sections and fill them with contrasting colors.
- Galaxy Pumpkins: Blend blues, purples, and blacks, then splatter white paint for stars. Add constellations if you’re feeling extra creative.
- Abstract Art: Go freehand with bold brushstrokes or Jackson Pollock-style paint splatters.
Insider Tip: If you’re new to painting, abstract splatter pumpkins are the easiest way to make a big impact.
Step-by-Step Guide: How to Paint a Pumpkin Like a Pro
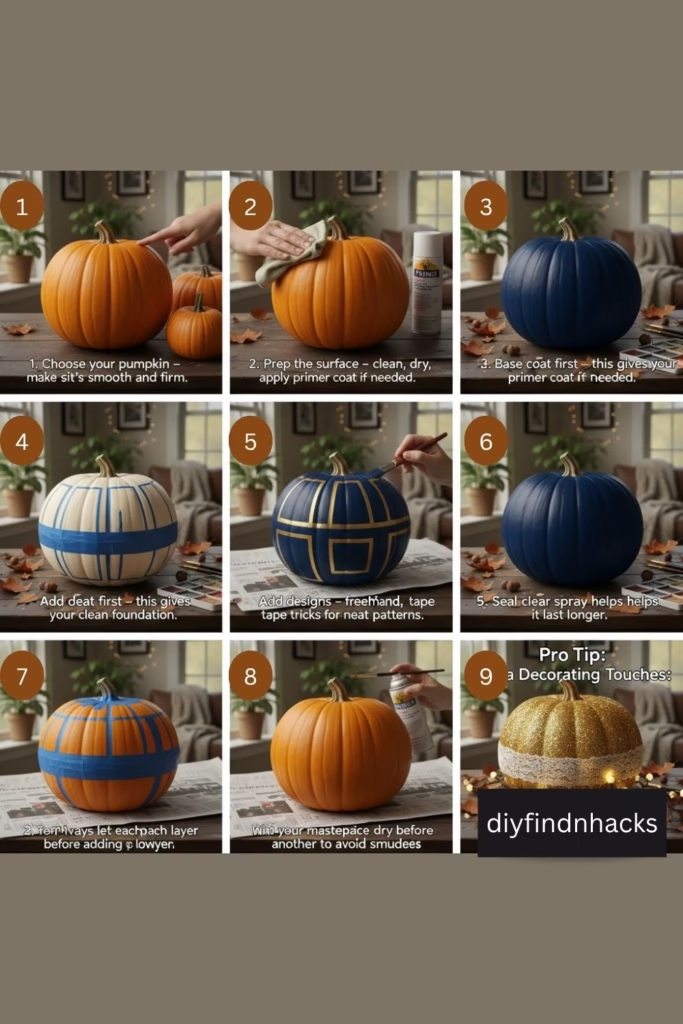
- Choose your pumpkin – make sure it’s smooth and firm.
- Prep the surface – clean, dry, and apply a primer coat if needed.
- Base coat first – this gives your design a clean foundation.
- Add designs – freehand, stencils, or tape tricks for neat patterns.
- Seal your masterpiece – a clear spray helps it last longer.
Pro Tip: Always let each paint layer dry before adding another to avoid smudges.
Extra Decorating Touches
Why stop at paint? Add-on decorations can elevate your pumpkin from cute DIY to showstopper décor.
- Glitter, rhinestones, or sequins for sparkle.
- Lace or fabric overlays for elegance.
- Decoupage with patterned tissue or napkins for a unique finish.
- Wrap fairy lights around pumpkins for a magical glow.
Host a Pumpkin Painting Party for Adults
Pumpkin painting is more fun with company! Turn it into a weekend hangout.
- Paint & Sip Night: Set up paints, pumpkins, and pour some wine—instant fall fun.
- Friendly Contests: Award prizes for “Most Creative” or “Spookiest Pumpkin.”
- Decor Goals: Style the space with fairy lights, fall leaves, and mason jars for a cozy vibe.
Insider Tip: Prep multiple base-coated pumpkins before guests arrive—it saves drying time and keeps the party flowing.
How to Make Painted Pumpkins Last Longer
Painted pumpkins can last weeks if you treat them right.
- Keep them indoors to avoid weather damage.
- Use a protective sealant.
- Faux pumpkins are reusable year after year—making them a worthy investment.
Final Thought
Pumpkin painting isn’t just another DIY—it’s a grown-up twist on a timeless tradition. From elegant metallics to spooky glow effects, there’s a design for every style and mood. So grab a brush, pour a cup of chai or wine, and turn your pumpkins into masterpieces this fall.
